Thursday, September 7, 2017
Welcome to the Fall 2017 Semester
This is the blog site that I have set up for my classes at Kean. Each week I post information relevant to my classes that semester, and this fall that will be my sections of Intro to Art. The title of each post will include the name of the class and the date it is referring to. I expect to follow the same plan for both sections, so unless something unusual happens, both Friday meetings will be covered by one post. The text of the post will be in red. Posts that are not about the class, but about other college stuff or outside things, will be in black.
The posts will usually go up in the evening following the class. They will include an overview of what happened in class, including images of student examples of the art projects worked on that day. I will also list any homework, and a list of materials needed the following week. Once in a while I'll have student examples of the following week's project, just to better explain what you'll need for the next week.
This is not an online class and this blog is not considered a substitute for attending the class. It is meant to help registered students keep caught up. If for some reason you must miss a class, this site will provide timely information about what you missed and how to make it up. Even if you never miss a single class, you may find it useful to get reminders of the homework, or when something is due, or just to check out what you'll need for the following week, as materials will be different almost every week. You might find it useful to see how other students approached the assignments. This site is up 24/7 and I find that most of the questions you'll have will be answered by what I've posted. If you have further questions relating to the class, you are welcome to e-mail me directly at my Kean box and I'll probably reply within 24 hours.
Friday, May 12, 2017
5/12/17 Mentor Sequence
Today's Class- Checked progress on the latest block and we discussed some possible plans for it. I showed a few older pieces from the early to mid 90's. One was internationally known woodcut master Tom Huck's second ever print.

The other was a piece from early in my MFA program using an unusual procedure for printing. Not something I am advocating, but something that could prove useful. As requested, I gave advice regarding ink cans and related materials. Reviewed a student artist statement as part of the wrapping up of the semester.
Homework- Need to see the revised artist statement by early next week so I can calculate the final grades for the semester.
5/12/17- Intro to Art
Today's Class- Our final meeting of the semester. We opened by looking at the 3D final projects, then I moved on to grading the portfolios. I also returned most of the papers and comic strips that I had been carrying around. Most students came back to pick up their work. Unclaimed work was left in the classrooms.
Homework- None of that, with the class done and no new work being accepted. A few late arriving papers were turned in during class- these will be graded over the next few days as class grades are due by the middle of next week.
Enjoy the summer.
Friday, May 5, 2017
5/5/17 Mentor Sequence
Today's Class- We looked at progress on the latest block, as well as a mixed media piece. Alternate approaches to relief printing were discussed, along with plans for the eventual exhibition.
Next week- Our final meeting of the semester. I expect to see a more finished version of an artist statement/exhibition statement, and we'll discuss plans for the summer.
5/5/17 Intro to Art
Today's Class- Today was a general work day. Some students brought materials and worked on their 3D final project. Some used the time to work on other class assignments, things from the portfolio that is due next week. More comic strips and museum papers were collected, and some of the previously submitted ones were returned. We had the last slide show of the semester, a very brief overview covering 15,000 years of sculpture in a mere 40 slides. A few students who had missed last week received the topic for their 3D final project.
How to make this up- Details about the 3D final can be found in last week's blog post. If you still don't have your topic, e-mail me and I'll select if for you.
Homework- Next week is our last meeting of the semester, so anything that you have not turned in yet must be in for next week if you wish to receive credit, such as museum papers, or excuse notes, and the two individually graded projects.
For next class 5/12/17- As part of our final meeting, I will be reviewing all the work in the semester portfolio- which is all the previously ungraded art assignments from this semester. If you never missed a class, you have it all done. However, if you may be missing something, here's the list of what I'll be looking for the and date you'll find it on this blog:
1/27/17 Contour lines of shoes
2/3/17 Negative space (chair and bottles)
2/10/17 Value Drawing (charcoal)
2/17/17 Mosaic collage
2/24/17 Basic color theory
(color wheel, complement mix, tints and shades)
3/3/17 Photography
3/17/17 Rhythm as a visual element
3/24/17 Printmaking (collagraph plate)
4/7/17 (more printmaking)
4/21/17 Drawing in perspective
Friday, April 28, 2017
4/28/17 Mentor Sequence
Today's Class- I looked at progress on the latest block, and discussed some technical stuff. One of those things was the use of rubbings as a way of verifying the level of cutting that has been done without inking and pulling a proof. For that purpose I recommend newsprint for paper (or anything else very thin) and pencil or other hard graphite. Besides providing a quick read of your cut block without an inky mess, one can use the block rubbing to experiment with deciding what to further cut- if you're debating whether or not to cut a particular section, you can try erasing the pencil from that part of the rubbing and see the new value balance for yourself. If you like the new result, go ahead and cut the wood. If not, fill the pencil back in and consider removing wood from a different area.

We also talked a little bit about rubbing techniques can be used for creative purposes, and I discussed some of the things I used to do in my college days. For a while I was regularly employing a technique where I cut a wood block as anyone else would, but then place a sheet of thin Japanese paper right on top of the dry wood, then rolled inked brayers over the top of the paper, which picked up the patterns of the cut wood underneath, sort of like a rubbing. This approach does not lend itself to creating proper edition prints, but if you just want to express yourself, there are a lot of possibilities. In the above example there was just one block cut, but three layers of ink (red, blue, black) applied using viscosity techniques.
For next week- I'm hoping to see the new block proofed, if not completely done.
4/28/17 Intro to Art
Today's Class- Today we started by looking at the comic strip 2D final projects that were due today. One at a time each student put theirs up and presented the work, explaining the choice of symbolic characters and explaining the story when necessary, though in most cases the plot was clear from the images and words. Below are a few examples from today's classes.


The other thing that we did today was to select the topics for the 3D final project, which will be the last project of the semester.
How to make this up- For the final project you will be choosing a random topic that will be the subject of the last project, a three dimensional representation of the randomly generated topic. Students in class drew slips of paper from hats, each with a word printed on it. (taken from headlines of book reviews in the Sunday New York Times) One hat contained nouns, the other one modifying words or phrases. Together, a new random concept was created. The assignment is to interpret that new random concept as a three dimensional sculpture. Below are some examples from previous semesters, with the phrase that was used to inspire them.

Apetite for Distraction

Impasse Changed

Planet Gone Wild

Plowing through the Nation

Troubled Uprising
You may use any materials you like in the creation of your 3D piece- craft materials, modeling clay, wood, found objects, etc. There needs to be evidence of your involvement in the creation of the final piece- you can't just buy it ready made and be done. It can be a simple freestanding object, have a base, or (as in some examples above) be in an open from box/frame. No specific size requirement. The two main things I'll be looking for are three dimensions and how you interpret your topic. Creative use of materials is a plus. This is not a sculpture class, and so classic modeling and carving techniques are not expected, but you should deal with formal issues as you have with other assignments this semester.
Homework- This 3D final project will be due at the beginning of class on May 12, 2017, our last meeting of the semester. They will be critiqued, graded, and returned that day. If you were not there today to pick your topic, you may either have me pick it for you, of I'll bring the slips and hats back next week.
The museum papers are due on May 5, 2017 if you wish to receive full credit. They will be accepted after that through the last day of class, but be considered late, and papers turned in on the last day can't be fixed and regraded.

One thing I did today was bring in the printed collagraphs I did for students who were not prepared to print the day we did it in class. If you didn't yet print your plate, you need to bring it in ready to go by next class, or be able to print it yourself to get the credit.
For next class 5/5/17- It will be a work day for the class. For most of you, that will likely be the 3D final, your best chance to have me provide further advice and guidance on the project, while having tables and spaces suitable for making potentially messy artworks. If you still need to make up anything else we've done this semester, it's an opportunity to do so. Looking back through this blog will show you everything we've done, and everything that is not the comic strip or the 3D final is part of the portfolio grade. If you haven't done it, you have until the end of the semester to get them done. So next week bring whatever materials, tools, etc you need to work on what you plan to do.
Friday, April 21, 2017
4/21/17 Mentor Sequence
Today's Class- Two weeks ago my student had put up all his recent prints for me to see, but was not there, so we couldn't discuss them. The prints were still up today and we did get to have a discussion of what he had accomplished, planned changes to the blocks that had been printed, and sketches and plans for some upcoming pieces. Below are photos of works from a few weeks ago.


For next class- just a few more weeks remaining in the semester. I look forward to seeing progress made on the latest block.
4/21/17 Intro to Art
Today's Class- Today we opened with finally doing the course evaluations. When those were done I was able to return to the classroom and get back to teaching art. The topic today was architecture, so I showed a few dozen slides of the history of architecture- highlights of ancient world through the Gothic period. Our art process today was perspective drawing, which is commonly used to depict architecture. We drew an interior corner of our classroom in two point perspective. A few students got my input on their museum papers, and several brought in the their unprinted collograph plates so could print them for them to be part of the portfolio collection in a few weeks. And I talked about what awaits the class for the rest of the semester, which isn't much now.
How to make this up- One of the great challenges of rendering real objects on paper is converting three dimensional reality to the limitations of a two dimensional surface, and losing a whole dimension makes it difficult. During the Renaissance drawing perspective systems were developed- procedures and rules for depicting three dimensional space on a flat surface in a way that made it logical and relatable, despite some distortions of reality. Properly and consistently done, those distortions can still provide an understanding of what the artist saw.
Below is an example of a two point perspective drawing of an interior corner of a room in Vaughn-Eames by a Kean student, the kind of thing we were doing today. Everyone chose a corner of the studio their class was in to depict, and started with a horizon/eye level line and a deep corner line, and gradually added the vanishing points and ceiling and floor lines, as well as other bits of the building architecture and sometimes furniture or other wall items. Some students had some experience with the process and took to the assignment quickly, while others were brought through it step by step. By the end of class all students present had completed the assignment.

It's a bit too complicated for me to explain it all here, so those who missed class today and don't already have experience with perspective drawing should wait until you talk to me in class where I can explain it a little better. Those who know the process can meet the portfolio assignment by choosing an interior corner of any room and drawing it in 2 point perspective. The corner should include the deep corner, floor and ceiling lines, at least two wall related items (such as a door, a window, something hanging) and one piece of free standing furniture (end table, file cabinet, small dresser, etc)
Homework- The need to finally have everyone fill out the course evaluations led me to extend the deadline for completing the 2D Final (comic strip project) to next week, 4/28/17. Part of that day will include students presenting their pieces to the class, after which I will collect them for grading.
The museum papers are due on May 5, 2017, though if they are turned in before that I can review them and advise as to how they can be revised to receive a better grade, while still being considered on time.
For next class 4/28/17- We will look at the comic strip projects, so bring those in. I will return the collograph prints that I print up for students from their constructed plates. And we will begin the 3D Final, which will be based on a randomly chosen topic for each student. Everyone will choose words from a hat (or equivalent) that will form a phrase that will be the subject of your piece. You can choose what materials to use, and we will use class time for that process the week after our next meeting. For next week I suggest sketch paper and a pencil (your big pad will do fine) to work out your ideas and plan what you'll need for the following week to build it.
Friday, April 7, 2017
4/7/17 Mentor Sequence II
Today's Class- No one showed up but me today, so there wasn't so much to do. One thing I had brought with me was a proof of my former student Tom Huck's second ever woodcut print, from 1993.

This one print was used to both satisfy the requirements of his then lithography class (used to create an image on a photolitho plate), and to gain admission to an MFA program in printmaking- not bad for a drawing major with little print experience. Goes to show what a motivated student can accomplish.
Kean is closed for Good Friday, so we won't be meeting next week.
4/7/17 Intro to Art
Today's Class- Thanks to an 8 mile back up on the Parkway, the morning class was a few minutes late in starting, but everyone had work to do. As planned, today was the day to print the collograph plates we made a few weeks ago, and I brought in materials and tools to make that possible.

Meanwhile, students continued work on last week's 2D final, the autobiographical comic strip project. As I was leaving late this afternoon, car radio reported a series of accidents on the Parkway South in the 130's, but if these had existed they were cleared up by the time I passed through. There was a pile of junk in the middle of one of the central lanes, but I managed to avoid that.
How to make this up- The print project is part of the semester portfolio, so not actually due until the end of the semester, but if you need help printing it, you need to bring it to me sooner. Don't know if I'll be bringing back all the printing stuff, or just collecting the plates and printing them in my studio down the shore.
Homework- The 2D final, the symbolic autobiographical comic strip project is due at the beginning of class on April 21, 2017. Full instructions and student examples can be seen on last week's post for this class.
Some students requested more time to complete the museum assignment, and I agreed to push the due date to May 5, 2017, our second to last meeting. Keep in mind that the purpose of having the deadline be before the last class is to allow the possibility of you correcting deficiencies in the papers and resubmitting it for a better grade. Papers submitted after that will not have the opportunity to be changed and regraded and will get the grade they get. You may submit the paper before then (as has already happened this semester) so that you know what you would need to do to make it better.
****University is closed on April 14, 2017 for Good Friday. No class next week****
For next class 4/21/17- Just four more meetings remain, with two projects. Next week the topic is architecture and the process for the portfolio is perspective drawing, which is commonly used in drawing buildings. Bring your 18" x 24" pad, pencil and eraser, and a ruler or other straightedge is very recommended.
Friday, March 31, 2017
3/31/17 Mentor Sequence II
Today's Class- We looked at the latest progress on the newest block, though we are still waiting to see the first proof of that block to see what it will actually look like. Followed up last week's discussion of block printing on fabric, looking at actual examples and discussing materials that can be used.
This lead to a discussion of Drive By Press, an artist run printmaking group. Founded by printmaking students from the midwest, what started as in independent project evolved into an industry. A small roller press was mounted on the back of a pickup truck and this truck has travelled the country, bringing a supply of carved blocks to all kinds of locations. Sometimes they went to places that had established studios and permanent equipment, including right here at Kean University. Wherever they went, those in attendance could receive a print from any of those blocks, printed on paper, but usually cloth. They would put it right on something you provided for a small fee, sell you a shirt with a print, or even put it on paper if you preferred. Below we see how a block could be printed on an apron, and the resulting piece, created right in VE 209.


Their visits included lectures on the history of their project and of printmaking in general, as well as displays of prints from many artists, such as the large composite relief print on cloth shown above, or a few highlights from their collection of works on paper from artists they were friends with.


They even helped to develop their own brand of relief ink, specially formulated for block printing on fabric, as in this t-shirt from 2010.
For next class- I expect to see the next block proofed, as well as get an update on the mixed media experiments that we were discussing this afternoon.
3/31/17 Intro to Art
Today's Class- Today the important concept was the idea of narrative, along with a look at symbolism. We saw some slides of art that tells stories, going from cave painting to the 20th century, stories both true and fictitious. Then we began on our first individually graded project of the semester (everything to this point is part of the semester portfolio), our major two dimensional project. Appropriate to the topic of the day, the piece is an autobiographical comic strip, inspired by Art Spiegelman's graphic novel MAUS.
How to make this up- You will be creating a comic strip that tells a true story from your life. Can be happy or sad, significant or unimportant, whatever you decide. As in the MAUS example, the characters will be symbols, either with relevance to the story itself, or relevance to you and the people portrayed in the story. Below are some student examples from previous semesters: (click on them to enlarge)


The strip will fill two full pages from your 18" x 24" pad and be done in full color- anything that isn't normally white (such as milk) should be in color. Dialog/thought balloons can also remain white. Text can be done with pens, markers, and other things capable of lettering. Such things can also be used for outlining and fine detail work. The bulk of the color should be done with pastels, either chalk or oil based- inexpensive ones are fine. There should be at least 12 panels between the two pages, though more is permitted. Panels can be identical in size or vary within a page as you find necessary. Pages can be either vertical or horizontal.
Homework- Work on this project will continue in class next week, and you'll be given time on your own beyond that to complete it before they are due for collection. That date will be determined based on what is completed next week.
For next class 4/7/17- We will continue on this comic strip 2D project. While that is going on, I will assist each student individually with the printing project. Bring your 18" x 24" pad, the completed progress on the comic strip, pencil and eraser, pastels, and the collograph printing plates you made last week.
Friday, March 24, 2017
3/24/17 Mentor Sequence II
Today's Class- Checked progress on some ongoing things, such as the newest block, and the written statement. We also looked at a few examples of group exchange folios, a common printmaking product where a group of print artists each make an edition large enough that they can exchange prints and all end up with a complete set, for no more than the cost of materials used to make their edition. I brought in three such sets that I had participated in, each with dozens of print examples from artists from around the country, and a wide variety of print mediums. Besides including my contribution, each set included work from such nationally and internationally known print artists as Tom Huck, Sean Star Wars. Bill Fick, and others.


Above- students looking at more exchange portfolio prints. Below- prints displayed by Drive By Press on one of their past visits to Vaughn-Eames.

Homework- Continue on the current piece, which will hopefully be ready to proof by next week.
3/24/17 Intro to Art
Today's Class- Today's topic was printmaking, which includes all mediums that make use of print processes, or using a fixed matrix to create multiples in art. I showed a few dozen art historical slides, covering some of the history of printmaking. At the same time I explained aspects of the processes. We discussed basics of relief, intaglio (etching), lithography, serigraphy (silkscreen), and monotype. Today's art project was also print related- with the students starting to make collographic printing plates using cardboard and scrap materials, although they may add other things from home before we print from them in 2 weeks. With one section we looked at the photos students took as part of the photo assignment given a few weeks ago, while the other section got back the graded research assignments. Next week the two sections will catch up to each other.
How to make this up- The first step is to create a collograph plate. You will need a piece of flat cardboard like material. I provided cereal boxes to the students (the broad front or back side is fine, or that of a cracker box will do), or you can use a piece of mat board about 8" x 10". To the backing board you will need to attach relatively flat material, creating a collage of sorts. These materials should have a variety of textures, and out process will be to print these textures using printing ink.

Above and below are examples from previous semesters of student collagraph plates and resulting prints. Prints were made with black printing ink, so the color of the objects on the plates had nothing to do with resulting images. (in the bowl of fruit above the color was added on top of the dried ink, just as was common going back to the renaissance, and you have the option of doing the same using watercolors or pastels from your kit)


Above and below are two more completed prints from previous semesters. Variations in value and texture in each piece are the result of variety in the collaged pieces, since all were printed with the same black ink.

Your choice of subject should be representational, but otherwise is up to you. At least eight (8) different textures should be represented in the plate that you make. You may use any materials you want, though anything too fragile (such as drying leaves) should be coated with spray acrylic or white glue to give it protection, and I advise staying away from cotton balls, which seem like they'd have interesting texture, but they are likely to stick to the ink. Keep in mind, that the print will be a mirror image of the plate, so if you want letters or numbers to be readable in the print, they will need to be backwards on the plate.
I expect to bring in printing materials (ink and tools) on April 7, 2017, so have you completed plate that day and we'll print them in class while you are working on another project.
Homework- Our second written assignment, the museum paper, is due on April 28, 2017 to receive full credit. Students who turn it in by then will have the opportunity to correct any mistakes or omissions and resubmit it for a better grade. One student turned in theirs already today, so it can be sooner than that if you wish.
For next class 3/31/17- We will be starting the first graded art project of the semester, our 2D final, and not part of the portfolio grade. It will make use of the pastels I asked you to buy and you'll have more than one week to finish it. Bring in your 18" x 24" pad, pencil and eraser, and a set of inexpensive color pastels (oil or chalk will work, whatever you can easily find)
Friday, March 17, 2017
3/17/17- Mentor Sequence II
Today we talked about some technical stuff, looked at state proofs of a few pieces, and discussed plans for the future. I brought up the less familiar, but still relevant, topic of wood engraving, showing book examples of the work of Lynd Ward. I pointed out that the level of detail he achieved can not be duplicated at that scale wth the wood and tools of woodcut, but did say that one can get a similar effect if the scale you are cutting is large enough. Below is an example of a large scale woodcut that I produced in grad school, which was influenced by the work of Ward, if not nearly to his skill level.

We also discussed how texture can be used to emphasize parts of a composition and to alter views of space (things with a lot of texture tend to advance, while things without it tend to recede in a composition. Something to keep in mind.
3/17/17 Intro to Art
Today's Class- Today's topic was rhythm as a visual element. Shapes, colors, lines, values- all things that can be used in ways that show rhythm in art. Sometimes rhythm is not particularly noticed in an artwork, but sometimes it can dominate. My plan today was to show a few dozen slides with good examples of rhythm as a visual element, and how each artist shown used it in their art, but the projector system kept breaking down. Each time we ended up moving on to the art portion of the day, which involved listening to segments of 5 different styles of mostly instrumental music and painting abstract compositions in watercolor to the results. At the end of class we looked at the resulting paintings, to see if we could guess which music inspired each one.
How to make this up- If you weren't there for class today, you'll have to find equivalent music on your own. This blog link lists the actual music used and equivalent pieces that can be used to substitute for the music in class.


To complete the exercise, open your pad to a blank page and have your watercolor paints ready. As the music selection plays, produce an abstract composition inspired by the music you experienced. The marks you use, the colors, the shapes, are all your choice, and ideally should reflect what the music made you feel. I'd prefer abstract compositions, rather than images of recognizable objects. Above are some examples from previous semesters, and more can be seen on the page with the list of music sources. This is a portfolio exercise and can be made up any time before the end of the semester for full credit.
Homework- The photography assignment should be completed for next week's class, 3/24/17. The printed photos can be brought in just as a stack, or mounted to a backing if you prefer. We will look at the results as part of class.
For next class 3/24/17- Our next project will involve printmaking, artworks produced by using a matrix that sets up the design, such as an etching plate, a relief block, a silk screen, or in our case, a collagraph.


The name is derived from the word collage, and is basically a collage that is inked and printed. Above is an example of a plate and the resulting print together, as well as some further print examples. Next week we will be making the plate, but that takes more than one week, so they will be printed later in the semester. Adding color to the dry print (as in the fruit example above) is an option and can be done with your pastels or watercolors. You won't need the big pad next week, but materials with interesting textures that you don't mind cutting up and gluing down are welcome, as well as having glue.
Friday, March 3, 2017
3/3/17 Mentor Sequence II
Today's Class- Two of the conversations we had today were about potential use of color in woodcuts, and black line/white line approaches to woodcut. I'll show examples of both here.
Black Line Vs White Line- In a standard black and white woodcut every thing in the image is either black (ink) or white (paper), although optical gray tones can be achieved by mark mixing. When we think of line, most people assume black on white, as in pencil on paper, or black relief ink on paper. Woodcut images can be produced that are essentially reproduced drawings on paper, and my Fourth of July series shows examples of how this idea can be explored.
The first one (October 20, 1993) is essentially a reproduced black line drawing on white paper, or what is sometimes called "black line" technique. The leaves are drawn with simple contour lines and then all the negative spaces were cut out, leaving behind black lines. The inked block reproduces those black lines.

The second one (October 14, 1993) depicts a bowl of rice noodle soup being eaten with the aid of chopsticks. The chopsticks are shown as a black line drawing, as is the hand holding them, and the contours of the bowl. However the noodles are carved out, what could be called "white line" technique. This image shows both black and white line being used in the same piece.

The third print (September 12, 1993) makes reference to a conversation with some fellow art students and depicts a bunch of animals, which I did as carving white lines into a solid black background. The result is essentially a white line contour drawing, the lines carved with small gouges, mostly a v-gouge.

Color in Woodcut

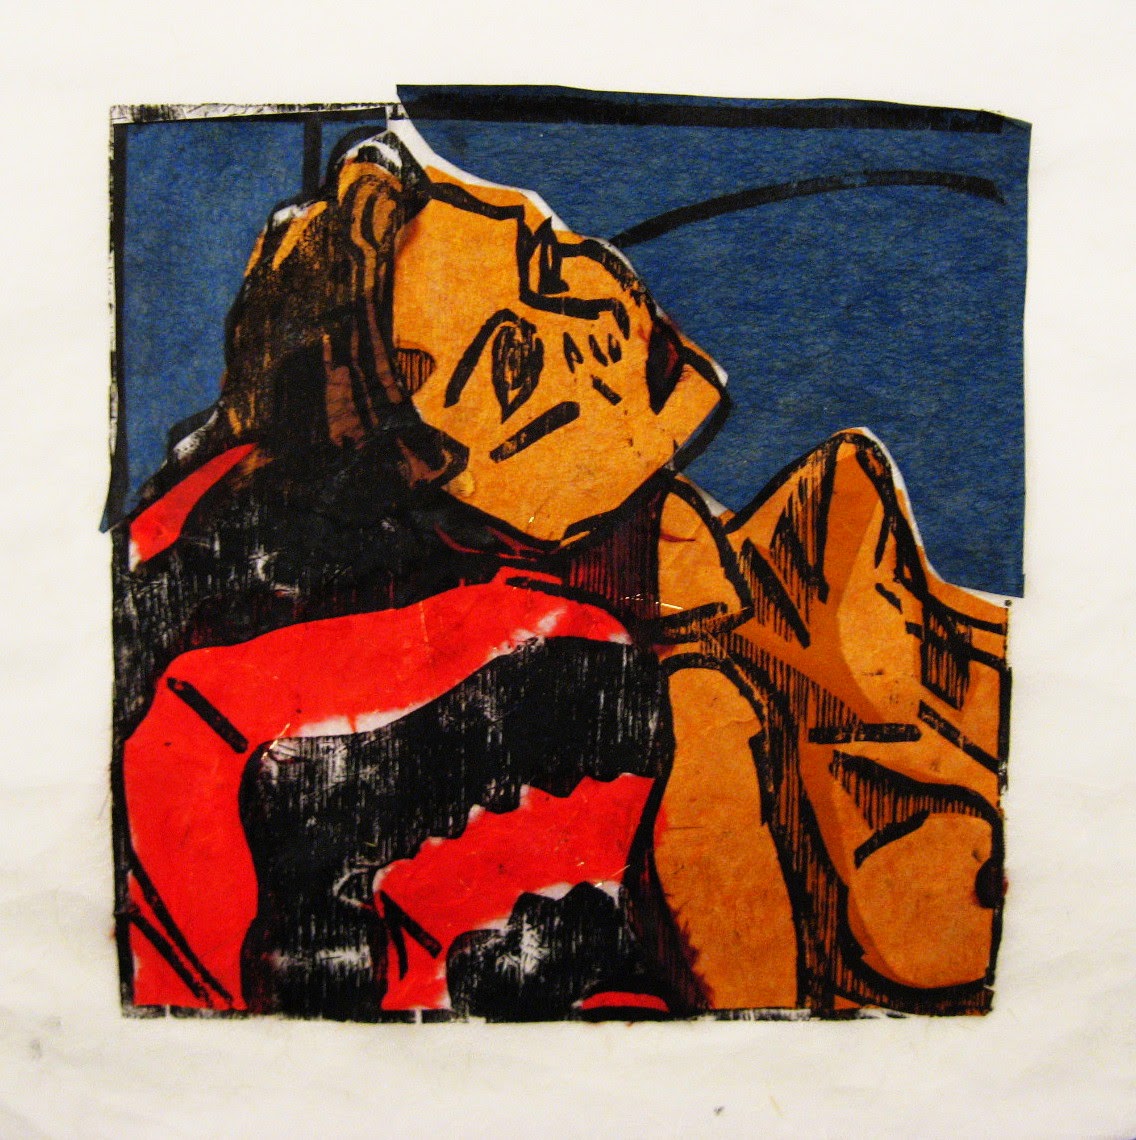
Color can be a useful tool for any artist, and that includes woodcut. Color can be in the form of ink, of paper, or other options. Over the past 20 years, most of my color use has been in the form of hand coloring, the most common approach to color in western prints going back to the renaissance. In those days it was common for print artists to print woodcuts and etchings with black ink, after which the prints would be turned over to other artists to apply color, generally done by painting the printed paper with some kind of pigment. My preference is to use watercolor, which requires a lot of work, but gives me most control over application and creating precise colors. Above is example from my Floating World series. Today I also mentioned that colored paper can be used, and below is an example I did like that. This particular one started with a collage of decorative colored paper, on which an image was printed with black ink from a wood block. Not nearly as precise as the watercolor approach, but a much bolder use of colors.

Pre-cut pieces of colored paper were place on the inked block, the ink helping to hold them in place.


Glue was added to the tops of the cut paper, then a larger piece of print paper on top of everything. Hand printed after that, which transferred the ink to the cut paper and to the large sheet, as well as gluing the small pieces to the large sheet at the same time. Below are the results.
Homework- Spring Break this week and you seem to have a plan for what you will accomplish in that time. I look forward to seeing the results when we return. I do hope to see an early draft of your artist statement for the show soon. Putting words about your work down on paper may help your realize new things about it and what you are trying to do.
For next class 3/17/17- Expecting to see the current block finished and a new one started.
Subscribe to:
Comments (Atom)