Monday, November 24, 2014

11/24/14 2D Design


Today's Class-  Typically when painters are working on a representational scene, they will choose colors that closely resemble the local colors in the subject, meaning the colors that we see looking at the original subject.  However, sometimes artists choose to invent new colors for what they see, and in this case it may be easiest to choose colors that have an established relationship.  The results can be a better color harmony and a logical structure.  Today everyone started a new graded project for which they will create four small color studies based on the same black and white photograph, choosing from among 6 different limited palettes and the relationships within each one.


How to make this up-  Select a black and white photograph.  As in the stipple project, it should be a photo of an actual object or scene (not digital/graphic art), with a wide range of values from light to dark.  Divide a sheet of your 18" x 24" paper into 4 equal sized quadrants (9" x 12") with your pencil, and then reproduce the composition of the photo in each of the four boxes.  Images can be vertical or horizontal.  Include as much detail as you need to know where the various colors of paint will go.  Color choices will be related to the value structure of the source photo and the rules established for each limited palette.  Above and below are student examples from previous semesters.  Additional examples and the specifics of each type of limited palette can be found here.


Homework-  This graded limited palettes project is due at the beginning of class on December 8, 2014. I've extended this deadline to December 15, 2014.

The color temperature season collage graded project is due at the beginning of class on December 1, 2014.

The museum paper is due on December 8, 2014.

For next class 12/1/14-  We will explore a more traditional approach to color with a portfolio exercise in still life painting.  Bring your 18" x 24" pad, pencil and eraser, and all your painting materials.  

Monday, November 17, 2014

11/17/14 2D Design


Today's Class- Today we went back to working with color, with a focus on color temperature.  I opened with showing about a dozen historical art works, and asked the students to decide whether the overall temperature of each painting was warm, cool, or a balanced mix.  Then I showed slides of a few examples of the project from previous semesters.  Toward the end of class I returned last week's woodcut prints and we visited the Gallery to see the current faculty exhibition.


How to make this up- You will be using your acrylic paints to mix many different colors.  Small pieces of these colors will be used to make two collages.  Each collage will represent one of the seasons of the year- all warm colors would be summer, all cool colors would be winter, and an even mix of warm and cool would be the transitional seasons of spring and autumn.  100 small 1" squares will be used to make each 10" square season.  Use either your large pad or a sketchbook to create the small squares, then cut them out, arrange them into the combination and pattern of your choice, then glue them to a page in your 18" x 24" to make the two seasons.  Each small square must be different from all the other small squares within the same season.  Above and below are student examples from previous semesters.  The full directions and more student examples can be seen here.


Homework-  This graded Color Temperature Season Collage project is due at the beginning of class on December 1, 2014.  However, I recommend finishing as much as possible before next week, as the next project will be more complex and may require a little more time to figure out.

Those who have not yet turned in their completed woodblocks should bring them in as soon as possible to receive partial credit.

Museum papers are due on December 8, 2014.

For next class 11/24/14- We will be starting another graded color project, on the topic of limited palettes, meaning specific color combinations that artists will employ for different reasons and effects.  You will need to start with a black and white photo, as we did for the dot drawings, once again a photo of a real object/scene, with a wide range of values from light to dark.  Also bring your 18" x 24" pad, pencil and eraser, and all your painting related materials. 


Monday, November 10, 2014

11/10/14 2D Design


Today's Class-  We opened today with a slide show of art through history featuring text as a visual element.  Around the world, forms of writing were derived from pictures, with images gradually evolving into language symbols.  Recognizable words and numerals in art can function both in communicating the concepts symbolized by those items, but also as purely visual elements in a composition.  Following that, I assigned two portfolio exercises related to the idea of text and symbols, worked on as I assisted each prepared student one at a time in printing their woodblock project.  The results from today's printing are shown below.


How to make this up- Those present completed two exercises, the first involving designing words, the second creating a symbolic business logo.

Descriptive Word Exercise-  The assignment was to design three words- using lettering style, spacing, location on the page, orientation, etc to depict each word in such a way that the specific meaning of the word could be determined without actually reading the word.  To make sure that the words wouldn't be read, I distributed to each student a few photocopied pages from an English-Russian textbook glossary. The words were alphabetized in English, but the students were required to use the Cyrillic lettering and spelling of the Russian translation.  Markers were used to create the lettering, all three on a single sheet of your 18" x 24" pad.  Toward the end of class we reviewed them, looking at each student's words and trying to guess the meanings.  Today no one guessed one exactly right, but some people came pretty close.  This works best with descriptive words (adverbs and adjectives) and words about activities.  Stay away from nouns, so we just don't get a bunch of words in the shape of recognizable objects.  Below are some examples from previous semesters.  You can make this up right away if you wish by using words from a Russian dictionary, or you can wait until next week and I'll give you some copied pages.  Below are student examples from a previous semester.


Symbolic Business Logo Exercise- The assignment was to design a logo for an imaginary business. The logo may include images, lettering, or both.  The logo should symbolize the main purpose of the business, so that seeing it should let the viewer know immediately what they would do.  The business should be imaginary in that it provides a product or service which is impossible in our world, or because the idea is just so stupid that the business would fail almost immediately.  Produce both a 1" square and 6" square version of the logo using pencils and or markers.  It can appear on the same page as the Russian words.  Below is a student example ("Buffalo Muffins") from a previous semester.


These are both portfolio exercises, which can be completed any time before the end of the semester to receive full credit.

Homework- Nothing new today, but if you didn't have your woodblock ready for today, complete it as soon as possible so it can be printed for partial credit.  The written museum assignments are due four weeks from today.

For next class 11/17/14-  We will go back to our study of color, which will be something we use every week for the rest of the semester.  Bring your 18" x 24" pad, acrylic paints, brushes, palette, palette knife, water container, scissors, glue, and pencil and eraser.  We'll be starting a new graded project related to color temperature.

Monday, November 3, 2014

11/3/14 2D Design


Today's Class-  Today we started our study of color, which will be a part of almost everything we do for the rest of the semester.  I showed slides with examples of color art from prehistoric to the present, discussing the technology of color, ways it was used, and what functions it serves.  Then then the class did a series of portfolio exercises involving color mixing.


How to make this up-  Use a sheet of your 18" x 24" paper to do the three exercises.  First, a color wheel that shows the primary, secondary, and intermediate colors.  Second, a mixing of a complementary set to create neutrals.  Third, taking a color seven steps into tints and shades.  Above are student examples from previous semesters.  Additional examples and the full directions can be found here.

These are portfolio exercises that must be made up by the end of the semester to receive full credit.

Homework-  Nothing new, but the completed cut blocks for the woodcut illustration project started last week are due at the beginning of class on November 10, 2014.

As we are past the halfway point of the semester I reminded everyone that the museum papers are due on December 8, 2014.

For next class 11/10/14-  While the class works on some exercises involving text as a visual element, I will help to print all the woodcuts.  Bring your 18" x 24" pad, paper for printing (can be the big paper or from a sketchbook), pencil and eraser, and various black markers.

Monday, October 27, 2014

10/27/14 2D Design


Today's Class-  We opened with a quick critique of last week's charcoal project, after which the graded drawings were returned to the students.  Then we started on the woodcut graded project.  I showed examples of student prints from previous semesters (more examples above and below), and discussed the idea of developing images and ideas using examples of my own work.  Students got to work sketching ideas on paper, and eventually started sketching them onto wood blocks I provided.  I demonstrated safe and effective methods of carving the blocks with both x-acto knives (which everyone has) and using traditional woodcut tools (only there with me today)  Progress varied, but everyone at least had their ideas worked out.


How to make this up-  You can't start on your block until you get the wood, but you can complete your design on paper.  The wood panel will be 8" x 6" and can be used either horizontally or vertically.  The assignment has two parts.  First, you must create an illustration from an age appropriate literary source (novel, short story, poem, fiction or non-fiction), so no fairy tales or kids books.  The design must be representational imagery with narrative elements, but does not have to be realistic to be successful.  Second, you must create an interesting composition using just black and white, something that can be appreciated for its design even if the viewer is not familiar with the story.  You can create the design with pencil on paper, but may choose to fill it in with a black marker to better see how it would look carved and printed.  Next week I'll have wood for anyone who wasn't there today. 

Homework-  The finished cut woodblock is due at the beginning of class on November 10, 2014.  We will print them in class on that day.

For next class 11/3/14- We will start our study of color with some basic exercises in color theory and color mixing.  Bring your 18" x 24" pad, pencil and eraser, acrylic paints (red, yellow, blue, white, black), paint brushes, palette, palette knife, and a container to hold water.  If anyone wants my opinion on the progress of their wood block, bring that with you. 

Monday, October 20, 2014

10/20/14 2D Design


Today's Class- Today we concluded our study of value drawing with a graded charcoal project, a still life drawing with mixed value subjects.  These drawings were collected and will be returned graded next week.  The last hour of the class was reserved for a slide presentation about printmaking, as we will begin our woodcut project next week.


How to make this up- To make up today's graded project you will have to set up your own still life with a variety of mixed value objects.  Use either type of charcoal to produce a full value drawing of the set up on a sheet of your 18" x 24" paper, and spray with fixative.  Additional student examples and the full directions can be found here.  This same page includes important information for next week's woodcut project.

This is a graded project and must me completed as soon as possible to receive partial credit.

Homework-  Start working on ideas for your woodcut book illustration.  You may bring in sketches if you want, but I hope you'll at least have some notes.  The sooner you are ready to start drawing on the wood, the more time you'll have in class to work on it.  Examples of previous student woodcuts can be found on the linked page in the above "How to make this up" section.

For next class 10/27/14-  We will begin the next graded project, a woodcut print illustration from a literary source of your choosing.  I will provide everyone with a piece of wood.  Bring paper for sketching (a small sketchbook will be fine, but you may use your 18" x 24" pad if you want), pencils and erasers, black markers, and your x-acto knife.  If you have a copy of your literary source, bring that a well in case you wish to consult it for details.

Monday, October 6, 2014

10/6/14 2D Design


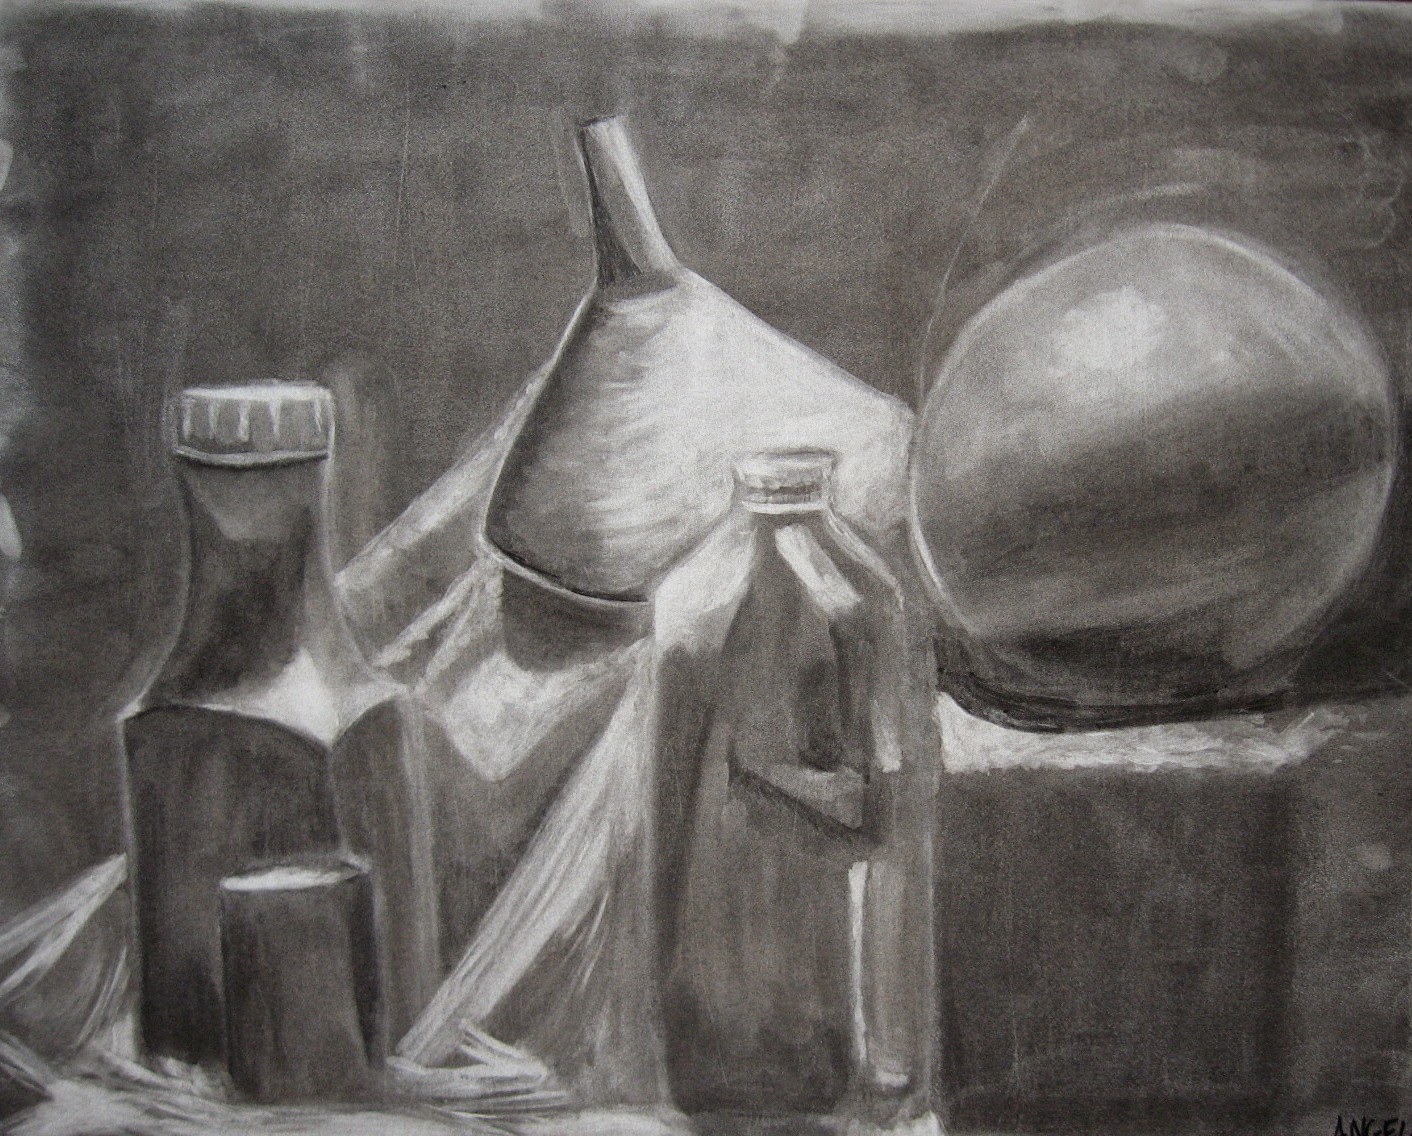
Today's Class-  Although the stipple drawing dealt with value, our study of value in 2D art really started today.  I reviewed definitions from the textbook related to value- the use of light and dark in two dimensional art to imply form, space, volume, time, and to focus attention.  I showed several dozen slides of historical and contemporary art and explained how value contributed to each.  Then I set up two simple still life groupings and had the class draw each with a different kind of charcoal and technique.


How to make this up- You will need to set up a still life with simple monochromatic objects- first all white, then mixed value.  Each drawing will require a sheet of your 18" x 24" paper.  One will be done as a value reduction- first fill the page with an even tone of vine charcoal, then use your kneaded eraser to draw the lights in the still life.  The other will be a more traditional value drawing, using compressed charcoal to draw on a sheet of white paper.  Student examples of both assignments, along with specific directions, can be found here.

These drawings are portfolio exercises and must be made up by the end of the semester to receive full credit, but if you have little or no experience with charcoal I recommend doing them before out next meeting for the experience, as the next charcoal drawings that you do are for a grade.

Homework- Nothing new, but if you still owe the stipple drawing or line final , the longer it takes for you to finish them, the more points will be lost.

****Columbus Day observed on 10/13/14-  No class next Monday***

For next class 10/20/14- We will finish up our study of value with one last charcoal still life drawing, using subjects of assorted values.  Those drawings will be collected to be graded.  We will also devote time at the end of class to discussing our next graded project, a woodcut print.  Bring your 18" x 24" pad, both kinds of charcoal, kneaded eraser, and spray fixative.  Tools for blending the charcoal are optional.

Monday, September 29, 2014

9/29/14 2D Design


Today's Class- Today we opened with a quick critique of the dot drawings, which were graded and returned by the end of class.  After that we finished our study of line with a graded project- a still life involving a variety of complex objects.


How to make this up- You will need to set up a still life grouping of your own with a variety of objects.  Then complete a line drawing of it using pencil on a sheet of your 18" x 24" paper, as in the above student example.  The specific instructions for how to set it up can be found here.

This is a graded project, and the amount of points it will be worth will go down with each week that it is late.

Homework- No new homework, but those who still owe either of the graded projects should make them up as soon as possible to receive partial credit.

For next class 10/6/14-  We will begin our study of value, the use of light and dark in art.  Bring your 18"x 24" drawing paper, both compressed and vine charcoal, kneaded erasers, and spray fixative.

Monday, September 22, 2014

9/22/14 2D Design


Today's Class- Today we started our study of line.  After discussing characteristics of line I showed several dozen slides with examples of how line has been used in art through history.  Following that, the class did a series of portfolio exercises involving aspects of contour line and negative space.

How to make this up- Information about the three portfolio exercises can be found below.  Follow the links at the end of each section to get the details.

Contour Line


We did a series of drawing exercises dealing with contour line, the simple line that surrounds a shape and helps define it.  We used shoes as the subject, simple objects that have similar characteristics to bodies.  Detailed descriptions of these exercises and see student examples of each can be found here.


Negative Space

Positive shapes are spaces surrounded by contour lines.  The empty spaces around and between the positive shapes are considered to be negative space.  The positive and negative each define the other, and thus are considered equally important in two dimensional art.  We used contour lines in two exercises that can be found here.

All the drawings done today were portfolio exercises that must be made up by the last day of the semester to receive full credit.


Homework-  Nothing new today, but the stipple (dot) drawing project begun in class last week is due at the beginning of class Monday, September 29, 2014.

For next class 9/29/14- We will open class next week with a critique of the first project, the dot or stipple drawings, then move on to our second graded project, a pencil line still life of mixed objects.  Bring the completed dot drawings and your original photo, your 18" x 24" pad, pencils, and eraser.  The dot drawings will be graded and returned before the end of class.

Tuesday, September 16, 2014

9/16/14 Printmaking


Tonight's Class-  A very busy night, just like a print studio should be.  Regular professor Julie was back and took over the class.  However, the parkway being what it is that time of day, I decided to hang around a while and help get everyone started on the linocut projects, with the first crit scheduled for next week.  Over the part of the class when I was there, the students got to see a demonstration of cutting linoleum, and demonstration of inking and printing, both by hand and with a press.  I also gave out a lot of tips and tricks on print related topics.

How to make this up- If you missed any of this information, you'll have to get it from Julie.

Homework- For undergrad printmakers, the first linocut project will be critiqued at the beginning of class next week September 23, 2014.

For next class 9/23/14- My official involvement with this class is now over, so this is the last weekly update for the print classes.  However, if there is anything that I need to share with everyone, this is the easiest place to post it.

Monday, September 15, 2014

9/15/14 2D Design


Today's Class-  Today we began our study of two dimensional art with the most basic unit of mark making, the dot or point.  We used these as the basis for a portfolio exercise and our first graded project of the semester.  I also distributed the museum assignment.

How to make this up- The details for each are below.

Wallpaper Exercise


For this exercise you will need a sheet of your 18" x 24" paper.  You don't need to tear it out of the pad.  Use a pencil to divide the sheet into 3 roughly equal columns, as in the student examples above and below.  Then make 3 different patterns using nothing but dots.  They can be any size.  You may use either the fine point or large markers, or mix both in the same image.  The patterns must start to repeat at least once between the top and bottom of the page.  In these examples the patterns are purely geometric, but you may use the dots to make patterns based on recognizable images or objects.  This is a portfolio exercise and must be completed by the end of the semester to receive credit.


Graded Stipple Drawing Project


For this graded project you need to select a black and white photograph of a three dimensional object or scene, ideally one with a wide range of values from light to dark.  Reproduce the image or part of the image as a compositional sketch using pencil line on paper.  Once you are satisfied with the shapes, using your ultra fine point marker to duplicate the value shapes using nothing but dots.  More dots make darker values, fewer make lighter tones.  In the above example, the original photo is on the right, and the student stipple drawing made from it is on the left.  (click on the photo to enlarge) Additional examples of this project and further instructions can be found here.

Homework- The graded stipple drawing project is due at the beginning of class on Monday, September 29, 2014.  You must bring in your original photo and the stipple drawing.

For next class 9/22/14-  We will start our study of line drawing with a series of portfolio exercises.  Bring your 18" x 24" pad. pencils and eraser.  The first exercise involves drawing from shoes, and since I may not have enough to go around, I recommend that everyone bring one with them.  It can be an extra, or take it off your foot.  It should be a closed shoe (dress shoe, sneaker, boot, etc), so avoid sandals and flip flops.  I will provide the subjects for the other exercises.

Tuesday, September 9, 2014

9/9/14 Printmaking


Today's Class-  Tonight we started working on projects.  I opened by bringing in more stuff to show to students, such as a variety of papers, and how things looked printed on them, such as the above large woodcut on kinwashi.  I also showed different states of some of my prints, from initial sketch to early proofs, to final version, to demonstrate the value of seeking opinions of other artists while developing an image.  After that, everyone worked on what they wanted to work on.

How to make this up- Students who are in the introductory class should at least have their face/portrait sketches worked out on paper.  Even better would be to have started drawing it on the linoleum.  

Homework- Finish the sketch for the linoleum print project, so you'll have time to cut and hopefully print them by next week.

For next class 9/16/14- If I am still teaching this class, we will open with a demonstration of how to cut linoleum, and later in the class there will be a printing demonstration.  Bring your linoleum, cutting tools, printing ink, and print paper.

Monday, September 8, 2014

9/8/14 2D Design


Today's Class-  Today was the first day of Two Dimensional Design.  I distributed the syllabus and reviewed the contents.  Then the class filled out a survey about their artistic background and interests, which we reviewed as a class, with me using the same form to let them know about my background.  After that, I went over some of the principles of design, things we will be dealing with in class this year.

How to make this up- Everyone was in today, so everyone has it done.

Homework- Nothing this week, except to be prepared for next week's class

For next class 9/15/14-  We will do a portfolio exercise and start a graded project making use of the most basic 2D mark, the point or dot.  For the project you will need a black and white photograph to work from.  The image must be a photo of a real three dimensional object or space, such a person, object, landscape, interior, etc.  You will be doing a drawing based on it, so choose something you feel comfortable working from (if you don't feel confident drawing a face, don't choose a face)  It should not be an artwork in itself.  What works best for this process is a photo that has a wide range of values- lights, mediums, and darks.  Your source photo can be an actual photographic print, or something you find in a book or magazine.  I will bring in a pile of old magazines that have some suitable photos, but I recommend that you bring something in with you, so you have an image you like and don't have to waste a portion of the class looking for something.

In addition to the photo, bring your 18"x 24" pad of drawing paper, pencil, eraser. two ultra fine point black markers, and larger black sharpie type marker.


Tuesday, September 2, 2014

9/2/14 Printmaking


Today's class- Tonight was the first meeting for this combined printmaking class and so everyone did the same thing.  I used my four rosters to gradually take attendance and distribute the appropriate syllabi for each student.  These were reviewed.  Then I showed slides, historical and contemporary, of prints in the same mediums as those you will be exploring this semester.  I also brought in several print exchange portfolios from my collection, so the class could see numerous examples of contemporary prints from professional printmakers from around the country, including several artists who are in the New York Public Library's print collection.

How to make this up-  If you are not familiar with these artists, take a few minutes to look up print work from Durer, Piranesi, Goya, Masereel, and the German Expressionists.

Homework- Think about ideas for next week.  Beginners will be doing portrait pieces, advanced students will be coming up with plans for the semester.

For next class 9/9/14- Students working on linocut should have a piece of unmounted linoleum, linocut tools, a sketchbook, pencil and eraser.  Black oil relief printing ink and proper print paper will be needed, but probably not until the week after.  The subject will be a portrait (self or someone else) so bring a mirror or photo to work from.  Advanced students are welcome to join the others in working with linoleum, or can bring in a sketchbook and start working on ideas for more complex print projects to be done this semester.

Monday, September 1, 2014

Welcome to the Fall 2014 Semester


This is the blog that I maintain for my classes at Kean University.  To avoid confusion between the various classes I teach, information for my 2D Design class will be written in blue text, while information for my Printmaking classes will appear in maroon text.  Information for both classes will use black text.

Following class each week I will post the details of what happened in that class.  I will included a description of what was discussed, exercises, and projects.  I will include photos of that work in applicable and available.  I will also include a description of any homework assignments, and the due dates.  


The purpose of this site is to help students catch up quickly if they have to miss some class time.  It is not a substitute for coming to class.  If you have to miss a week, this will allow you to quickly learn how make up the work covered.   Even students who never miss a class find it useful- seeing images of previous student examples, or just verifying the date that homework is due.  It is available 24/7 without having to wait for me to reply to your e-mail.  Of course, if you need more information than what is available on the site, you are welcome to e-mail me with questions and I'll get back to you within a day usually, but in my experience, most of what students are looking for will be here.


Tuesday, May 13, 2014

5/13/14 3D Design


Today's Class- Today was our final meeting of the semester.  Some arrived bright and early, others drifted in over the course of the day.  Some were ready to inflate their final projects, some still had some work to go.  Below are photos of all of today's completed Final Projects:


With the inflatable pieces done, and a few other late arriving projects completed and graded, class came to an end.  Anything not claimed on the class storage shelf was disposed of, the room swept and locked up.


Final semester grades will be calculated and submitted to the university later this week.  They will be available to students whenever it is that the school decides to do that.  

Enjoy the summer.

Tuesday, May 6, 2014

5/6/14 3D Design


Today's Class- Today was a general work day.  Most students took on the main construction of their inflatable animals.  It was almost like a surgical clinic for clear plastic animals.  Almost everyone finished the main body of the animal and was able to successfully test inflate it.  Some were able to also spend time finishing up some late projects.


How to make this up- Next week is our final meeting, the last chance to have your work graded. Some people are completely caught up, but most of you are missing one or two items.  Here is a list of everything we have done this semester, and the date on the blog where it was introduced:

Portfolio Exercises-

Feb 4  Asymmetrical
Feb 25  Planes  (cars)
Mar 4  Coffee trays
April 15  Canons of proportion
April 22  Figures in room proportion

Individually Graded Projects-

Jan 28  Modules
Feb 11  Relief panels 
Mar 18  Found Objects (plastic)
Mar 25  Book sculpture
April 8  Found Objects (natural
April 29 Final Project- inflatable

The Museum Paper (Useful Links at the top of the column on the right.)

Homework-  Everyone needs to finish their Final Project and bring it to class next week for the final critique.  If there is anything on the above list that you haven't finished yet, get it done for next week. If you have any excuse notes, this is your last chance to bring them in.

For next class 5/13/14- You may use the time to finish your Final Projects, and whenever you are ready to inflate it, they will be graded.  Show up early and you'll be finished early.  No work will be accepted after the end of the class.

Tuesday, April 29, 2014

4/29/14 3D Design


Today's Class-  Today we began the final project of the semester.  You will be creating a large scale inflatable sculpture with the subject being some kind of living thing.  The first step was to do pencil sketches of potential designs.  The second step was to create a scale model using foam core or bristol board, so you could think about the design of parts to make it.  Construction of the sculpture will begin next week.  


Everyone was there for at least part of the day, so you all should know the assignment.  Above is an example from last semester of some pencil sketches of animals and plants, as well as a 3D model of one of the creatures, a shark.  Below is a photo of the inflatable shark that was eventually made by a group of students.


Use the scale model to determine what kind of pieces of plastic will be required to make the sculpture.  You'll be needing to get some clear plastic drop cloths (available wherever house paint is sold), and they'll be held together with clear plastic sealing tape, sold in home centers and wherever packaging materials are sold.  Use your model to estimate the required square footage of plastic and length of tape needed.  What you make must be at least 8 feet long in one direction, and it must have some kind of articulations- legs, fins, wings, so you're not just making a simple tube.  More details of the assignment and more student examples can be found here.

Homework- This Final Project is due on May 13, 2014, our final day of class.  The sooner that day that you have shown me your inflated sculpture, the sooner you will be done, so try to get there early.

For next class 5/6/14-  This will be a general work day for whatever you need to do, and I imagine most will use it to construct their inflatable sculptures.  However, you may also use the time for anything related to class, such as any back projects that you sill owe, or portfolio exercises that you haven't completed yet, or to work on your museum paper.  Bring with you whatever you need to complete whatever you plan to work on.

Images for Final Project 4/29/14


The Final Project will require creating a large sculpture.  The process will begin with sketches, and then expanding one of the sketches into a small 3D bristol board model.  The subject must be a living thing.


The last part of the project will be to build an inflatable sculpture based on the model, using clear plastic drop cloths and plastic sealing tape.  The final piece should be at least 8 feet in one dimension and must include articulated projections.  You may work in groups of 2 or 3 on one inflatable piece.  You will have the next two weeks to work on it as well and it will be due the last day of class.  Below are examples of pieces made in last semester's class.


Tuesday, April 22, 2014

4/22/14 3D Design


Today's Class-  We opened today by looking at completed projects, particularly the natural found objects pieces that were due today, but also any back projects that had come in , such as book sculptures or plastic found objects.  The rest of the day was spent working on a portfolio exercise, a sort of a continuation of last week's proportions exercise, this time involving creating an environment for the figures.  I also collected and reviewed museum papers, letting students know what needed to be done in order to complete the assignment.


How to make this up-  We started by looking at slide examples of installation art involving figures, specifically examples from  Edward Keinholz and New Jersey sculptor George Segal, each creating environments for life size figure sculptures.  You need to select some portions of our classroom to reproduce at the same proportions as the first constructed figure, the one that looks like the figure in the original photo from last week.  You need to make one major piece of furniture, such as one of the work tables, or one of the big power tools (table saw, drill press, etc), a cabinet, a portion of the wall with a specific feature (chalk board, doorway)  If you make the work table, include the top, the base, and one of the mounted vice clamps; if not the work table, bring what you make to a similar level of detail.  Also make one small piece of furniture, such as one of the stools.  

The furniture/classroom pieces should be to the same scale, and should be of the same scale as your figure.  You need to decide how tall your figure is.  The tops of our tables are 5' 6" long, a very typical human height, so if you make that your figure's height, you have a handy measuring resource.  Some students used their own bodies, standing next to items and noting where parts lined up with knees, hips, etc.  Construct the pieces using foam core, and when showing it, include your first figure in the created environment.  Above are examples created last semester, a project that required two major pieces of classroom, but you only need one and the stool for today's assignment.

This is a portfolio exercise that must be made up by the last day of the semester to receive full credit.  You may need to wait until next week to gain access to the classroom and select what parts you'll be reproducing.

Homework-  Nothing new, but anyone who still owes a back graded project or the museum paper should get them done as soon as possible to receive partial credit.

For next class 4/29/14- We will be starting on the Final Project of the semester, where we'll take something from sketch, to scale model, to large three dimensional sculpture.  For the first stage you'll need a sketchbook (or equivalent paper for drawing), pencil and eraser, bristol board, scissors or knife, and suitable glue.