Tuesday, March 18, 2014

3/18/14 3D Design


Today's Class-  Today we started a new graded project involving found object assemblages.  Found objects are any existing materials, but for this project we are limiting ourselves to manufactured items originally created for some other purpose.  Most commonly used are plastic and light metals, but items made from rubber, glass, cloth, paper, and electronic parts may be of use.  Hot glue is the most common way of attaching things, but you may use wire, nuts and bolts, or anything else you can think of.


How to make this up-  You will need a supply of found objects.  Some students brought an assortment with them to class, and I had a small supply of items I had collected from my house, mostly plastic caps from soda bottles, milk and orange juice containers, parts of containers for toiletries, bread bag closing tabs, and starter plant label tabs.  Some start with an idea of something they wish to make, while others just put together a big pile of cast off plastics and look to see if they are inspired to make anything.

As for the assignment, you are to make a representational sculpture, something that resembles a recognizable subject in terms of overall shape and proportion, as well as color and texture.  It must be at least 12 inches in at least one dimension (height, length, diameter, etc).  Your representation can be life size or an enlargement.  I posted examples from a professional artist of this style of work on the previous blog post, and further instructions and student examples from last semester can be seen here.  Above (snake) and below (cupcake) are pieces in progress from today's class.


Homework-  This found object sculpture project is due at the beginning of class on April 1, 2014, at which time they will be critiqued, graded, and returned.

Students who still owe back projects and portfolio exercises should try to completed them as soon as possible, especially graded projects, which lose points for each week they are late.

For next class 3/25/14- We will start a new graded project involving creating three dimensional sculptures from discarded books.  Bring two old books you don't mind cutting up (one for the project, and a spare in case you mess up the first one), preferably hard cover, at least 300 pages, and with cover dimensions about 8"x 6".  ( a little larger is fine, but you don't want to get much smaller)  A few pieces of foam core, or even scraps of corrugated cardboard, of the same dimensions may be helpful for working out ideas before you start cutting up the book.  You will also need a pencil, your x-acto knife and spare blades are recommended (dull blades tend to tear paper rather than cut it).


Tuesday, March 4, 2014

3/4/14 3D Design


Today's Class- We opened by looking at the foam core relief panels projects, which were graded and returned by the end of the day.  Most of the class period was spent working on new portfolio exercise creating sculptures from parts of pulp cardboard coffee trays and similar materials.  The last part of class was spent talking about our next graded project, found object sculptures made from discarded plastic and metal objects.


How to make this up-  Get yourself 3 or 4 of the molded pulp cardboard trays available wherever a lot of take out coffee is sold.  These are designed specifically to hold coffee cups, but also have very complex shapes, with concave and convex curves and spaces top and bottom, and interesting transitions from one part to another.  Spend a few minutes carefully looking at the trays, and consider what you might do with the various shapes.  When you are ready, start to cut them into pieces with your scissors or x-acto knife, and then assemble the pieces into a sculpture.  You may make a representative object, or just create an abstract design.  The important thing is to take advantage of the shapes available to you.  Above are two examples from today's class.  Additional directions and student examples can be found here.

This is a portfolio exercise that can be made up any time before the end of the semester, but I recommend doing it soon for two reasons.  First of all, the big projects at the end of the semester will be time consuming.  Second, considering how to use the shape possibilities here will be good practice for the next major project involving cast off plastic.

Homework-  Nothing new, but those who still owe the modules project or the foam core relief panels should try to get them done as soon as possible to receive partial credit.

*******Spring Break  March 10 to 14, 2014.  No class next week*******

For next class 3/18/14- We will start our next graded project, found object sculptures making use of cast off plastics, metal, and other manufactured items.  Below are several examples of such sculptures made by New Jersey artist Lisa Bagwell.  Her materials are all things she finds as garbage or has given to her by friends who are familiar with her art.


Above and below are two views of a piece based on a sub sandwich.  The bread is made from wine corks, and the filling includes plastic lids, gloves, disposable plastic razors, and sponges.  The olive on top is made from plastic bottle caps.  


Above is a bird made largely from starter plant label tabs, a conch shell made from plastic cigar mouthpiece tips, and an ice cream cone that includes popsicle sticks, bottle caps, and a plastic spout.  Some of the same materials were used below for the hawk in a cork tree.  


The egret below is largely made from plastic utensils and pencils.


The shapes and colors of your found objects must be part of the design.  You can arrive to class with a plan, or just bring a bunch of stuff and see what it can be when you get there.  Bring your supply of found objects, hot glue gun and sticks, and anything that you might use to build on or fasten it.  Also consider what will form the main volume of your object that the surface colors and textures are attached to.  The resulting sculptures must be at least 12" in one dimension and resemble the subjects in terms of proportion, shape, and color. 

More 3D Class examples for 3/4/14- plastic


Examples of representative sculptures made from manufactured found objects.  


Above  and Below- Assorted Sculptures from
artist Lisa Bagwell


Above and Below- pieces from
previous 3D students


Tuesday, February 25, 2014

2/25/14 3D Design


Today's Class-  I opened today with a few dozen slides of 20th century art, work that emphasized planes- relatively flat surfaces and their movements.  I also had a few slides of art that took on motorized vehicles (trains and automobiles) as subject, as an introduction to today's exercise.  The rest of the class period was spent working on the exercise, using foam core and bristol board to build a simple model of a car of the student's choosing, and then an abstract sculpture using identical copies of all the same parts.


How to make this up- Choose any car you like based solely on its appearance.  Can be any make, model, or age.  Using photos of the car from multiple angles, reproduce the car's basic shape, with an emphasis on the exterior surfaces.  As you make each piece for your car, make a second identical piece and set it aside.  Once you've completed the car, use the second set of pieces to build an abstract sculpture of your choosing, any form that doesn't look like a car.  Above is an example from today's class.  More detailed instructions, and additional student examples, can be found here.

This is a portfolio exercise and must be completed by the end of the semester to receive full credit, but I suggest finishing it soon.  After spring break the projects will be bigger.

Homework-  The two foam core relief panels begun two weeks ago are due at the beginning of class on March 4, 2014.  

Reminder- deadline to withdraw from classes is March 4, 2014.  Students still on the roster after that will remain in the class and get the grade they earn.  Students who stop coming to class at that point, and thus stop turning in work, will fail.

For next class 3/4/14- We will open with a group critique of the foam core relief projects, which I will grade and return.  Then we will be doing another portfolio exercise involving complex shapes.  Bring 3 or more cardboard pulp coffee tray/holders, scissors and/or x-acto knife, and glue.  If you would prefer to use hot glue, we have guns, but you'll need to get some hot glue sticks.

Tuesday, February 18, 2014

2/18/14 3D Design


Today's Class-  Due to what I believe was the fourth snow since our last meeting, Kean University scheduled a delayed opening for 11:00 am, and I decided to delay it a little further to noon, to make sure everyone, including myself, would have time to get there.  As it turned out, the travel conditions were better than expected and I was on campus at 11:00, and students started showing up after 12:00.

With only a half day to work with, and a very reduced number of students, it didn't make sense to start the planned car-related exercise.  So today those present were able to continue working on the foam core relief project we started last week.  

How to make this up- The instructions and details for the foam core reliefs project can be found in last week's blog post.  It has been updated to include images of my examples of the initial skeleton piece, and a second relief on another thing with similar proportions and motifs in the positive and negative relationship.

Homework- The pair of foam core relief panels is due at the beginning of class on March 4, 2014.  

For next class 2/25/14- We will go back to the planned outline and do a portfolio exercise related to the concept of surface planes- the car assignment.  Bring images from multiple directions of an automobile that you like specifically because of its physical appearance- any style or age is fine.  Also bring  a sketchbook, pencil and eraser. foam core, bristol board, x-acto knife and scissors, and white glue.


Tuesday, February 11, 2014

2/11/14 3D Design


Today's Class- We opened with a group critique of the Make 100 Module project.  These were graded and returned by the end of class.  After that we looked at several slides of art featuring negative space and relief elements, then started our next graded project, using foam core to create relief sculpture.  

Below is an example of using foam core in this process.  It is a different project from today's but it gives an idea of what it can look like- a broad piece of foam core with a layer of cut and shaped pieces glued over the top to create a relief sculpture surface. The areas that have been cut become negative spaces in the composition, and the raised areas become the positive shapes.  In both two dimensional and three dimensional art, positive and negative spaces are equally important.


How to make this up-  For the new assignment you will need two 12" x 12" pieces of foam core, which will be the bases for two relief sculptures.  We are going to use skeletons for the starting point of the first one.  Skeletons are successful design, evolved over millions of years to help support and protect the owners of that framework.  The bones can be thought of as positive shapes, and the spaces inside and between are negative shapes.  I distributed photocopies of skeletons, a mixture of student drawings of human skeletons and book illustrations of animal skeletons, although students also had the option of finding one on their own.  Below is one of the human skeleton images that were available.


Below is a demonstration piece I started today using that drawing, concentrating on the area of the rib cage.  The resulting relief piece is not medically accurate, but maintains the positive/negative relationship of the original.  Your relief composition should use the entire 12" square base.   As in my example, you may choose a small piece of the skeleton and enlarge it.  My sample is using all white foam core, but some students have requested to use both black and white, one for the base and the other for the raised relief elements, and that is fine if you like the idea.


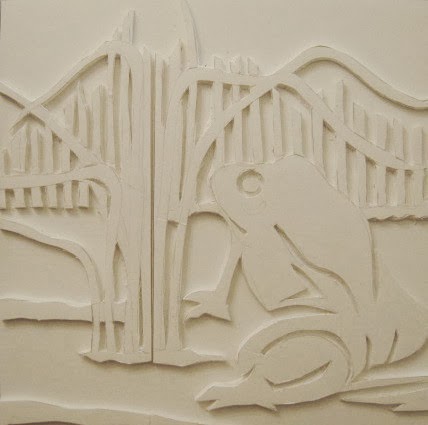
For the second piece, you will select something different to depict.  It can be a living thing or inanimate object, or even a scene with multiple objects, but your subject should be something that normally has some three dimensional quality.  I suggest you start by sketching the composition on paper first.  For the second relief sculpture, create a design with a breakdown of positive and negative shapes with a proportion similar to the skeleton piece.  The shapes need not have any relationship to bones, though that is an option if you like.  In my second piece below (frog on the ground near some plants) I have several long curved crossing elements, which echoes movements in the rib cage, and the frog includes shape that relate to the skeleton's shoulder blades.


Homework- The two panels of this graded relief assignment are due at the beginning of class on March 4, 2014. 

Semester Schedule Change-  

Although we have not yet missed any class time due to the winter weather, it's requiring me to rearrange the planned schedule for the semester.  The graded project originally scheduled to start in two weeks requires me and you to gather materials found in nature, and right now everything outside is covered with a thick layer of snow and more is on the way.  We will still do everything planned on the syllabus, just in a different order.  Here is the new plan going forward:

Week 5  Planes and movement
Week 6  Complex contour surfaces (coffee holders)
Week 7  Textures and colors from life (found objects)
Week 8  Changing points of view (found objects)
Week 9  Changing points of view continued
Week 10 Forms in nature (found natural objects)
Week 11 Proportions (foam core/bristol)
Week 12 Proportions continued
Week 13 Begin Final Project
Week 14 Final Continued
Week 15 Final critique/all work due

I'll provide reminders each week regarding the required materials.

For next class 2/18/14- We will look at the use of planes (surfaces) in sculpture in a portfolio exercise.  You will need to bring to class images of a favorite automobile from a purely exterior design perspective.  Last time I had a class do this most went with sports cars or pick up trucks, but any style or vintage is acceptable.  You should have photos of the vehicle from different sides, to aid you in building a simple model of your car, which will lead us to the second, more abstract half of the design exercise.  Bring a piece of foam core, bristol board, sketchbook and pencil, scissors and/or x-acto knife, and glue.

Tuesday, February 4, 2014

2/4/14 3D Design


Today's Class- We started today by reviewing some textbook definitions of sculpture, including various processes used.  We then moved on to a discussion of the concept of symmetry and asymmetry, and examples of how they are used in three dimensional art.  That was the starting point for a portfolio exercise that dealt with those concepts.  We also took a walk over to the Bamboo show in the Burger Gallery, since it is relevant to some projects we'll be doing later this semester.


How to make this up- Students started by thinking about objects that demonstrate symmetry, and selecting one to turn into a three dimensional sketch made from bristol board.  Above and below are two student examples from today's class.  The specific requirements for this assignment, as well as additional student examples, can be found here.

This is a portfolio exercise, which must be made up by the end of the semester to receive full credit, though it's recommended you do it soon to get experience with the materials that will help when working on other projects.


Homework-  The Make 100 Modules graded project is due at the beginning of class on February 11, 2014.  If you haven't yet seen the Bamboo show at the Burger Gallery in the CAS building, I recommend you do so before it closes on Friday.

For next class 2/11/14-  After a critique of the first graded project we will begin the second, which will make use of the idea of relief sculpture.  Bring two small size (20" x 30") pieces of white foam core, x-acto knife and spare blades, white glue, a sketchbook, and pencil and eraser.

Tuesday, January 28, 2014

1/28/14 3D Design


Today's Class-  Today we began our study of 3D design.  We opened with a brief discussion of the nature of three dimensional art, and how it differs from two dimensional art, as well as overviews of materials and processes. The museum assignment was distributed and reviewed.  Most of the day was spent working on our first graded project of the semester, a sculpture built from 100 identical three dimensional modules made from bristol board.


How to make this up-  The first step is to create the modules.  I brought in a few sample pieces and had students sketch out ideas and then produce a prototype of one of their ideas with bristol board.  Once that was worked out, they started making identical copies, with the goal of making 100 of them.  The project will be completed by gluing the modules together to make a single sculpture, as in the example above.  The specifics of the assignment, as well as additional examples of completed student projects from previous semesters, can be found here.

Homework-  This 100 module graded project will be due at the beginning of class on February 11, 2014.  

For next class 2/4/14- We will look at more formal design issues and complete a portfolio exercise related to ideas of symmetry and asymmetry.  Bring your sketchbook, pencil and eraser, a few sheets of bristol board, scissors or x-acto knife, white glue, and two sculptural bases (simple stiff boards such as form core or mat board) about 8" x 10". 


Tuesday, January 21, 2014

1/21/14 3D Design


Today's Class- Today was the first meeting of the semester for our class.  Despite the winter weather, most of the students on the roster were able to make it in.  With snow already falling and more on the way, we kept it short and to the point.  I distributed the syllabus and reviewed its contents with the class.  Then I had the class fill out a survey of their art backgrounds, which we discussed as a class.  I used the same form to talk about my own background in art, including three dimensional.

How to make this up-  Students who missed today's class should just come next week, assuming we don't have another Tuesday snowstorm.  (it has snowed on the last three Tuesdays of the spring and fall semesters)  

Homework-  Nothing yet.

For next class 1/28/14- We will start our study of three dimensional design.  I will discuss some of the basic principles, and we will begin the first project of the semester.  Bring a sketchbook and pencils, three full size (about 18" x 24") sheets of bristol board or the equivalent amount of smaller sheets, scissors or x-acto knife, and white glue.  Masking tape may be helpful for holding things together during the gluing process.


Friday, January 17, 2014

Welcome to the Spring 2014 Semester

This is the blog that I have set up for my classes at Kean University.  To avoid confusion with other classes I teach here, the text for all postings specific to my 3D Design class will be in orange text.  Postings for general purposes will be in black text.

Each week I will post information about the class.  This will include a detailed description of the projects done or started that day, and of any homework.  Photos of completed versions of those projects will be included if applicable and available.  I will also include any due dates and the list of materials needed for the following week's class.  The title of each post will be the name of the class and the date of that particular class meeting.  About a month's worth of class meetings will appear on the main page, but postings from classes earlier in the semester can be found by using the archive function in the right hand column.  

This blog will be useful for anyone who misses a class for any reason.  Some students may even make up the missed work before the next class meeting.  But even students who never miss a class take advantage of it- to get more homework information, to see student examples of the assigned projects, to get a reminder about what they need for the next meeting.  It's available 24/7 without having to wait for me to reply to your e-mail.  Of course, if you have a question that isn't answered by what is posted here you are welcome to e-mail me and I'll get back to you as soon as I see it, usually within the day.

Tuesday, December 17, 2013

3D Design Final Project Examples


Last semester, working in groups, the class made six inflatable sculptures to end the semester.  In the end, all six creations were blown up at least long enough for everyone to see the intended shapes.  Below are shots of each one:


Tuesday, December 10, 2013

12/10/13 3D Design


Today's class- Today's plan was to spend most of the day working in groups on the final project, the large scale inflatable pieces.  However, the expected snow storm that arrived this morning made that a little more difficult.  We did look at the book projects, and I graded some late arriving examples of other  graded projects from the past month.  The books were graded and left on our class shelves in the classroom.  I returned the museum papers that had been handed in last week with instructions about what was needed to improve the grade.  And a few groups hung around long enough to actually begin making their inflatable sculptures.

How to make this up-  We didn't start anything new today.  Details about all the back projects can be found on this blog.  Graded projects can be turned in up to 5 weeks late for partial credit, which means I will still accept the plastic parts piece, the canon of proportion/classroom piece, and the book carving project on the final day.  If you still owe any of the portfolio exercises (asymmetrical bristol board, car and abstract sculpture from car parts, coffee holders, canon of proportions two figures) they can still be brought in for full credit.  Museum papers may also be turned in next week.  Nothing will be accepted after the official end of our class next Tuesday afternoon.

Homework-  The Inflatable Sculpture Final Project is due at our last meeting of the semester on December 17, 2013.  In addition to each group's large inflatable piece, each student needs to show their pencil sketches of five early ideas, and the one model they constructed from bristol board/foam core.  

For next class 12/17/13- Normally on the last day of class we open with a critique, I dismiss everyone temporarily while I grade stuff, and then have everyone return before the end of class to learn the grades and to pick up their stuff.  However, seeing the possibility that some students may need some classroom time next week to finish their Final Projects, I will allow students to use the early portion of the class to construct their projects.  (at the beginning of next week's class I'll see where everyone is at and decide at exactly what time we'll have the critique) Bring your clear plastic, rolls of package sealing tape, and scissors, along with the drawings and models from last week, and anything else you need graded.  

Tuesday, December 3, 2013

3D Design Inflatable Sculpture


The Assignment- This project comes to us courtesy of John Siblik,  current professor of sculpture and a former classmate of mine.  In our school days, he was primarily a painter, but like all good art students he worked in a variety of media.  While we were out in the midwest he participated in an outdoor sculpture competition that started with detailed sketches of his idea, then a scale model, and finally the full size work: a ten foot long piece that appeared to be a giant piece of intestine erupting from the ground.  

He sent me a link to photos of this inflatable project that his students have had success with, so we're going to give it a try.  We will follow a similar set of steps.  You will be designing an inflatable sculpture that is at least 8 feet long in one dimension, made from thin clear plastic drop cloths and clear plastic sealing tape, and inflated with a shop vac in reverse.  The sculpture must be based on a living thing and must include articulated shapes.  (you can't just make a tube, call it a snake, and be done with it)  Today we worked on the first step, developing a plan.  Each student made pencil sketches of five ideas, and then constructed a simple model of one of the ideas using bristol board and foam core.  Below are some examples from last semester.  


Students will be working in groups of 2 or 3, so each group will select from their paper models which one idea to create at the full 8 foot scale.  You also may work by yourself if you prefer.

Photos of finished inflatable sculptures from last semester may be seen here.


Tuesday, November 26, 2013

11/26/13 3D Design


Today's Class-  By now all of you should have gotten the word that today's class was cancelled.  We will return next Tuesday, December 3rd, and work on the final project for the rest of the semester.  The museum paper is due that day, so perhaps you'll use today to get that written.  Last week's blog post includes all the information about other dates and what you'll need for next week's class meeting.

Enjoy the holiday.


Tuesday, November 19, 2013

11/19/13 3D Design


Today's Class- Today we continued the book carving projects that were started last week.   We also took some time to look at the scale model classroom projects that were begun a few weeks ago.  I went over with each student their status on all projects, reminded everyone about the paper, and confirmed the class holiday next week.

How to make this up-  This is the same project worked in class last week, and the specifics can be seen on last week's blog post.

Homework- The completed book project is due at the beginning of class on December 10, 2013.

The museum papers are due on December 3, 2013.  Papers submitted by that date will be returned graded the following week for those who wish to fix and resubmit them before the end of the semester.  Papers will be accepted as late during the last two weeks of class as well.

Those who still owe a back project should try to get it done as soon as possible.  We are running out of semester for you to make up work.

               ****Schedule Change*****

 We will not be meeting on Tuesday November 26th.  Use the time to catch up on back projects or to work on your museum assignment.

For next class 12/3/13-  We will be starting the final project of the semester, which will begin with creating a scale model proposal for a final project.  Bring bristol board, sketchbook, scissors/x-acto knife, glue, pencil and eraser.

Tuesday, November 12, 2013

3D Design Book Sculpture

The Assignment   The project is to create a sculpture using the raw material of a traditionally bound book.  I recommend a hardcover book of about 250 - 300 pages, with a cover around 6" x 9".  Can be a little bigger, but much smaller will give you little space to work.  You have a choice of two approaches, one carving away to create a single static scene with positive shapes, or a design that emphasizes negative shapes that change as the viewer continues to move through the book.  In both cases, the book must be able to open and close as it always could, and all the changes are made from cutting only.  No glue can be used to hold anything together- all pages must be still attached to the original binding.

A) Carve away parts of all the pages to reveal a three dimensional positive recognizable object.  You may have the book with just its front cover open to create a single block of bound pages to be carved, or have the book open to somewhere in the middle so that the sculpture is spread over both pages.  It can be a single image (as in the portrait below) or a group of things creating a scene, such as elements in a landscape.  The resulting piece should show significant depth.  Below is a student example.


B) Create a more abstract negative sculpture that changes as readers move through the book.  Divide the book into four roughly equally thick sections.  Within each section create multiple negative shapes.  One of the negative shapes should be continued into the next section  (the exact dimensions can change within the section and/or as it moves into the next section, but the created void must continue from one to the next) , but not into a third section.  For example, a shape cut through the first section should be connected to a shape cut through the second section, but not with the third, while a new shape that starts in the second section will continue into the third, and so forth.  Below is a student example from different locations in the book.


Above- book with front cover open
Below- book open about halfway


This project will be continued next week in class.

Tuesday, November 5, 2013

11/5/13 3D Design


Today's Class-  Today we opened by looking at some of the completed pairs of figures from the Canon of Proportion exercise.  Everyone agreed that the changed proportions definitely altered our reactions to the figure.  Then we looked at a few slides of sculptural installations that included figures and began a new graded project based on the previously made figure sculptures and the idea of relative proportions.

How to make this up-  First, you must have completed the exercise from October 15th when the pairs of figures based on images taken from a magazine was started.  Take your first figure, representing the original proportions of the photographed figure.  Measure its height and assign a height to the original photographed model.  Use that ratio to create a scale for reproducing a portion of our classroom.


Start by choosing a piece of our classroom.  Your installation must include the desk you sit at each week, the next major object in any direction you choose, one stool, and your 3D rendition of the figure.    The next major object can be another table, a part of the wall or door, a different kind of table, a counter top, etc.  Carefully measure your table and the major elements of next big object, as well as the space to the next big object.  Sketch this out on paper, then perform the calculations to figure the size of the pieces you'll be making to maintain the scale of your figure.  Construct these items out of foam core, including a piece of the floor that connects them.  Glue the major items in place, maintaining the proper proportion of space between them.  Above and below are three examples completed today- an installation that includes a work table and the adjacent wall, one with a work table and counter, and one that includes two work tables.


Homework-  This graded proportional room project is due at the beginning of class on November 19, 2013.

The representative sculpture made from manufactured materials (plastic, etc) is due at the beginning of class on November 12, 2013.

For next class 11/12/13-  We will make some sculptures using books as a raw material.  Have at least two hardcover books that you don't mind cutting up, each 300 or more pages and covers in the vicinity of 8" x 6"  Also bring sketchbook and pencil, x-acto knife, and several pieces of foam core or corrugated cardboard cut to the same dimensions at the book covers.

Tuesday, October 29, 2013

3D Design Found Objects- Plastic


The Assignment-    For this project, you will be creating a sculpture from found objects, meaning items that already exist in the world, previously manufactured for some other purpose.  Materials should be chosen and used for their shape, texture, and color.  The materials may be used whole or broken into smaller pieces.  You may use wood for structural purposes, and any way of joining it (hot glue, nuts and bolts, etc) that you want.  For larger volumes, plastic bottles and containers make a simple and lightweight support structure. The subject should be some kind of representational sculpture, and your sculpture should bear strong resemblance to the chosen subject.  It must be 12 inches in at least one dimension.  Above and below are student examples from last semester.  


Tuesday, October 22, 2013

3D Design- Coffee Trays Portfolio Exercise


The Assignment- Get yourself 3 or 4 of the coffee trays, which are generally available at any place that sells lot of take out coffee.  Carefully observe all the parts of the trays, noting the convoluted shapes, bulges, and curves.  When you are ready to start, cut your trays apart into the pieces that will be used to make your sculpture and glue it together.  As for the piece you make, no particular subject here, so you may make something based on an object, or work more in an abstract design approach.  (the above student examples from last semester's class include a flower, a dragon, a mutant duck, and an abstract snowflake) I do ask that you try to push the use of negative spaces in the work, which can include spaces that go all through a part of the work, or interior spaces surrounded by the cardboard.  

This is a class portfolio exercise, which is due by the end of the semester, but I suggest you get it done as soon as possible so you aren't worried about making it up at the end of the semester..