Today's Class- We opened with a group critique of the Make 100 Module project. These were graded and returned by the end of class. After that we looked at several slides of art featuring negative space and relief elements, then started our next graded project, using foam core to create relief sculpture.
Below is an example of using foam core in this process. It is a different project from today's but it gives an idea of what it can look like- a broad piece of foam core with a layer of cut and shaped pieces glued over the top to create a relief sculpture surface. The areas that have been cut become negative spaces in the composition, and the raised areas become the positive shapes. In both two dimensional and three dimensional art, positive and negative spaces are equally important.

How to make this up- For the new assignment you will need two 12" x 12" pieces of foam core, which will be the bases for two relief sculptures. We are going to use skeletons for the starting point of the first one. Skeletons are successful design, evolved over millions of years to help support and protect the owners of that framework. The bones can be thought of as positive shapes, and the spaces inside and between are negative shapes. I distributed photocopies of skeletons, a mixture of student drawings of human skeletons and book illustrations of animal skeletons, although students also had the option of finding one on their own. Below is one of the human skeleton images that were available.

Below is a demonstration piece I started today using that drawing, concentrating on the area of the rib cage. The resulting relief piece is not medically accurate, but maintains the positive/negative relationship of the original. Your relief composition should use the entire 12" square base. As in my example, you may choose a small piece of the skeleton and enlarge it. My sample is using all white foam core, but some students have requested to use both black and white, one for the base and the other for the raised relief elements, and that is fine if you like the idea.

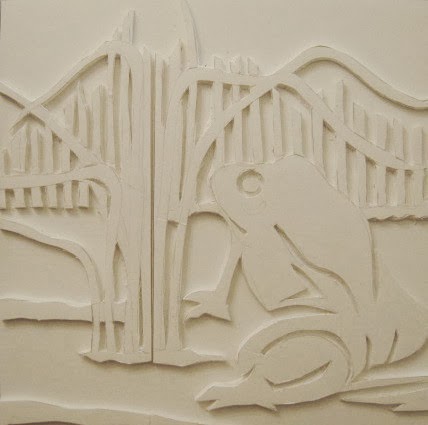
For the second piece, you will select something different to depict. It can be a living thing or inanimate object, or even a scene with multiple objects, but your subject should be something that normally has some three dimensional quality. I suggest you start by sketching the composition on paper first. For the second relief sculpture, create a design with a breakdown of positive and negative shapes with a proportion similar to the skeleton piece. The shapes need not have any relationship to bones, though that is an option if you like. In my second piece below (frog on the ground near some plants) I have several long curved crossing elements, which echoes movements in the rib cage, and the frog includes shape that relate to the skeleton's shoulder blades.
Homework- The two panels of this graded relief assignment are due at the beginning of class on March 4, 2014.
Semester Schedule Change-
Although we have not yet missed any class time due to the winter weather, it's requiring me to rearrange the planned schedule for the semester. The graded project originally scheduled to start in two weeks requires me and you to gather materials found in nature, and right now everything outside is covered with a thick layer of snow and more is on the way. We will still do everything planned on the syllabus, just in a different order. Here is the new plan going forward:
Week 5 Planes and movement
Week 6 Complex contour surfaces (coffee holders)
Week 7 Textures and colors from life (found objects)
Week 8 Changing points of view (found objects)
Week 9 Changing points of view continued
Week 10 Forms in nature (found natural objects)
Week 11 Proportions (foam core/bristol)
Week 12 Proportions continued
Week 13 Begin Final Project
Week 14 Final Continued
Week 15 Final critique/all work due
I'll provide reminders each week regarding the required materials.
For next class 2/18/14- We will look at the use of planes (surfaces) in sculpture in a portfolio exercise. You will need to bring to class images of a favorite automobile from a purely exterior design perspective. Last time I had a class do this most went with sports cars or pick up trucks, but any style or vintage is acceptable. You should have photos of the vehicle from different sides, to aid you in building a simple model of your car, which will lead us to the second, more abstract half of the design exercise. Bring a piece of foam core, bristol board, sketchbook and pencil, scissors and/or x-acto knife, and glue.