Some of you have a little experience with pastels, and some of you don't. Not to worry. Pastels are drawing sticks, a combination of a medium and colored pigments, just like paints are. In watercolors, the medium is gum arabic, a plant based thickener that dissolves easily in water, which is why they can be squeezed from tubes, or used dry with a wet brush. Most pastels are either oil or chalk based, and those with the same base can be combined together. (conte crayons are also sticks, but much harder with a hard clay base, much more difficult to blend) Because of their softness, pastels can be blended and mixed. For the same reason, they can also be very messy, so I recommend wearing old clothes, and maybe putting down some old newspapers first. Below are examples from Sangita Phadke and Tzelan Guh, two local artists from the shore area. This level of skill is not necessary to get a good grade in this class (you have seen examples of student comic strips already), but here just to show you what can be accomplished with the medium and practice.
Pastels can be smoothed and blended by any tool the artist finds useful for that purpose. A common tool is a stump or tortillon often found in drawing kits- looks like a stick made of white paper with a point. Made of small strips of paper tightly wound around itself, and serves the purpose well, for blending pencil, charcoal, or pastels. They can also be sold by themselves. Don't have one- no problem. Some artists prefer just to use their fingers. All variety of pastels clean up with soap and water. Or if you want to keep your fingers clean, a hunk of paper towel does well. Or a Q-tip, an eraser, whatever.
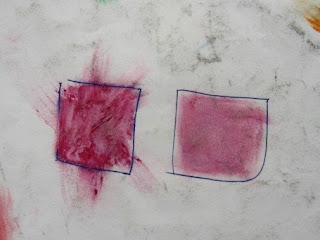
Both oil and chalk pastels do smear easily, especially when applied thickly. Below are two examples of thickly drawn pastels, and we see how easily they can smear beyond what was intended. On the left is the thick pastel smeared beyond the intended area. My suggestion is to either use less, or use it in a small area and then intentionally smear it into the other areas. Not only do you end up with more even coloring, but once it has been smeared around, the applied color should be more stable.
Another example here. Applied thickly on the left, there is a danger of the color being smeared into the areas where it wasn't wanted. Applied to a smaller area (right) and gradually blended into the undrawn areas can have a neater result. You can always add more, but they are not easy to erase.
One way to take advantage of the softness and blending nature of pastels is color combining. Same rules used in paint mixing apply. Colors next to each other on the color wheel (what are called analogous colors) combine easily, as closely related colors. Or it can be done with colors opposite on the color wheel (complements, as in red and green, blue and orange) to create neutrals. Put next to each other, smear the edges together, and you can get a blend from one color to the other, as in these examples below using red, orange, and yellow. Or create a color you don't have by putting down a first color, then a layer of second color on top, then blending the two colors together to create a third. You learned how to do it with watercolors, so now you can do it with pastels if you want to.
You can always practice these techniques on scrap paper first, see how to get the results you are seeking, and then try it on your comic strip. And on any art you want to make in the future. Our class does not require it, but if you wish to make your finished pastel drawing more stable and less likely to ever smear, it can be sprayed with a fixative, which are commonly sold where art supplies are found, usually among the drawing materials. (also works on charcoal) Read the can carefully, as cans of spray adhesive look similar, and if you spray your drawing with that, not only will it not be stabilized, but it will be sticky for a very long time.


No comments:
Post a Comment